Akai MPD32 mapping for Traktor Pro
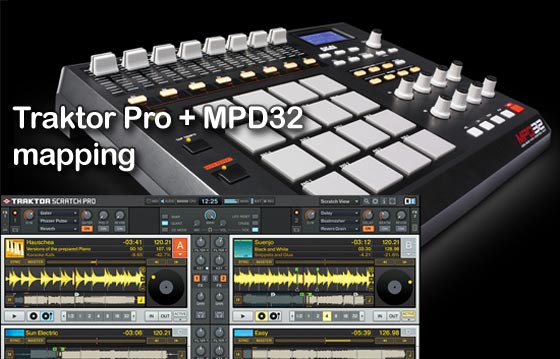
I’ve spent a lot of time on planning and configuring well working midi controller mapping that will allow creative workflow when deep in the mix. It’s not perfect yet but it’s a good start and will be a great base to start from if you are new to midi mapping of if you’re having hard time making a mapping of your own.
To make it even better I decided to share it with fellow DJ’s who are also using MPD32 to control Traktor and hopefully you’ll share some ideas that could be implemented into this mapping.
Note! This version is outdated, new version 2.0 is available.
So here’s how I’ve mapped my MPD32:
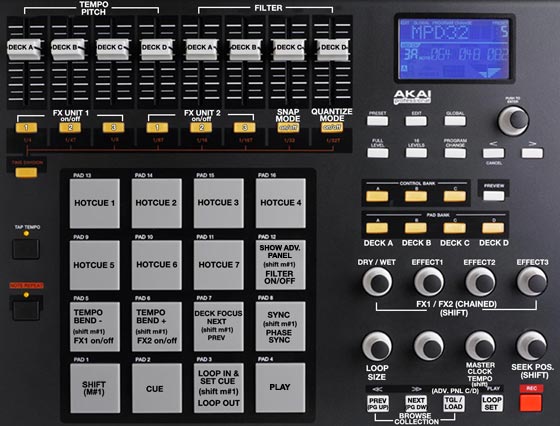
I see you have your thumb in your mouth and you’re going umm… so lets break things into pieces to get a clear picture about what’s going on here.
 First of all each pad bank is assigned to individual deck; Pad bank A is assigned to deck A, pad bank B is assigned to deck B and C to C and D to D. Pads in each pad bank are assigned to same controls so you’ll just have to choose which deck you would like to control at the time.
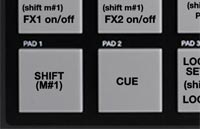 Next up few words about the pads. On the bottom left corner is a pad labeled as “Shift (M#1) which is assigned as Modifier #1. Modifier works like a shift button so you can have two controls assigned to one pad/button/knob. Each Controller assignment can additionally define two Modifiers with a value for each. Only when the Modifiers have the defined values is the command executed. For example I have a pad where I have assigned “tempo bend -” and “FX1 on/off” which has modifier #1 value 1. So normally it works as a pitch bend but when you hold the “Shift (M#1)” pad down FX1 on/off command will be executed instead of pitch bend.
If you look at my MPD32 mapping layout you’ll notice that there is many controls which have a label called “(shift m#1)”. This means that the control assignment written below the “shift m#1” in brackets is executed only when shift button is hold down. On few occasions there is only one control assigned but if there’s a “(shift)” label under the assigned control you’ll need to use the shift to execute it and this is just for precaution so that you won’t accidentally change your master tempo or seek through your track when deep in the mix.
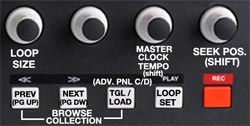 Transport buttons in the bottom right corner on your MPD32 I have assigned to control browsing. Rightmost button is assigned to set loop on/off. You can change the length of the loop with the leftmost knob above the transport buttons.
The righmost knob is assigned for “seek position” which means that you can quickly scroll through loaded track in focused deck and find the position you are looking for. Second knob from the right is assigned for “Master Clock” which means that you can change the master BPM and it’ll effect on all decks that are sync’d to current Master Clock tempo source. Both of these knobs will work only in combination with the “Shift M#1” pad.
The “toggle/load” button has a “double macro” which means that there are two functions assigned to act simultaneously. So first time when you press the “toggle/load” button the window layout changes to browse mode and the second time you press the button it’ll not just switch back to full deck view but also loads the selected track to the deck on focus. Here Richie Hawtin explains what’s a double macro:
http://www.youtube-nocookie.com/v/TTGwg6Kz0y8&hl=en_US&fs=1&
 To the upper row of knobs I have mapped chained FX controls for FX units 1 & 2. With the first knob you can control FX dry/wet and other three are for amount of each FX slot (1-3) and effects of your choice. You can see that there’s “(shift)” label under the knobs in my layout, which means that FX2 is controlled holding the shift key down as explained earlier in this post.
 Time division row includes on/off switches for each FX slot in FX units 1 & 2. There are also on/off switches for “Snap Mode” and “Quantize Mode”.
 Last controls to cover are faders. First four faders from the left are assigned to control “Tempo Pitch” and each deck has its own dedicated fader, first one for deck A, second for deck B, 3rd for deck C and 4th for deck D. The other group of faders (5 to 8) is assigned to control Filter on each deck.
Gimme gimme gimme… So we’ve covered all the controls and you’re anxious to load this set of mappings into your own MPD so here you go:
Download v.1.2 (Updated: February 8, 2010)
- The .zip file includes:
- Full layout picture
- Traktor .tsi file which includes Controller Mappings and GUI Layout
- .SQS file for the MPD32 settings. Use Vyzex to apply these settings
Remember to take backups of the files you are going to overwrite!!
Hey there! Really apreciate your work! I already did my first video with your map: http://www.youtube.com/watch?v=gzRqciStYFw. A good idea would be if you can delete the hotcues with the shift button: shift & HotCue1 = delete HotCue1… Can you do that? Would be nice!
Greetings from Switzerland
Hey, thanks for the idea and posting your video! Glad that you like the mapping 🙂 Actually ability to delete hotcues with shift button is on my to-do-list among some other ideas that I try to implement as soon as I have enough time to play around with those ideas. So definitely it’s coming but please be patient with the next update because I’m too busy until the end of this month.
Cheers,
De Souza
Hey de souza! Another idea: If you change the decks (pad banks abcd) it would be great if the deck focus will change too. Can you manage these soon?
cheers
Hi Norman,
Unfortunately control bank and pad bank buttons are non midi buttons which means that these buttons don’t send any midi values from the controller. Therefore these buttons can’t be assigned at all.
A big big thanks…. I works really great…
I find your mapping quite good! I will be using it for a party next week in place of my own. 😉 Keep up the good work sir.
Keep Bangin’
I’m sorry that I haven’t had time to make any changes to the mapping for a long time but finally today I’m going to release an update based on feedback that I’ve received since last update. So get your MPD’s ready to rumble! The update will be online soon… 😉
Hey,
I have an Akai MPK49… It has all the same controls, less 4 pads. Is there any way to use your mappings with my MPK49? I tried importing it into Traktor, but it comes up with a blank mapping.
Thanks,
Carl
I’m quite sure that it’s impossible. Although the two have all the same controls, the layout doesn’t match and those are using completely different keys/pads/knobs to send Midi CC messages. Hope that you’ll find some alternative resource for MPK49 mapping.
All the best,
DS
BTW, if you have Traktor version 1.2.3 or higher you should download my mapping version 2.0 or 2.0.1. Whilst you’re not able to use my mapping with your MPK49 (or it’s unusable directly) you should still be able to see it in Traktor. That way you could go through my mapping and re-learn all the controls to match your controller.